Wednesday, November 28, 2012

DIY Dainty Bracelet!

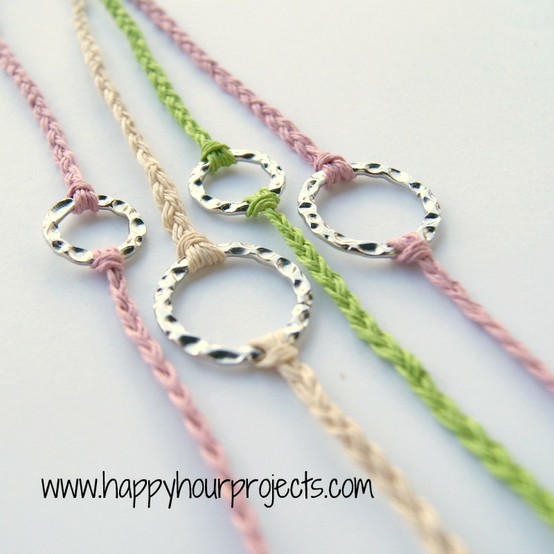
Flash back to the days of making friendship bracelets as a kid! This version is easy, fast, and a little more grown-up. I saw this post on Pinterest and thought it would be fun to make as a stocking stuffer for my sister. So I went to the local craft store(Hobby Lobby) and got the embroidery thread(.29 cents a color) from the sewing department and the silver rings($1.49 on sale) from the jewelry department. Total cost, $2.49! 


I switched a few things up...I used smaller rings, and I used embroidery thread instead of twine. The beauty of this simple craft is that it is all up to personal taste!

The original Pin:
http://happyhourprojects.com/2012/06/the-ten-minute-bracelet.html

Visit her site for her tutorial and for more fun DIY bracelets! She has a ton!


How I made mine:

1) I followed her tutorial pretty closely. I took my first color and ring and I cut 3 strands of the thread.
2) I bent the strands in half to make a loop at one end. Then I pulled the loop and ends of the thread thru the ring and pulled tight. Now I had 6 strands of thread ends.
3) Next, I grouped 2 threads each into 3 sections and braided to my desired length. 
4) I repeated step 1-3 on the other side. 

Ta Da! A dainty little bracelet. Then I repeated with 4 more colors. 

I tried them on together and think they are pretty fun! Was tempted to keep them for myself. Ha! Hope my sister likes her new little trinkets!

Happy Pinning! And Happy Holiday Crafting!


Wednesday, November 21, 2012

How to Refinish Laminate Furniture. No sanding!

Over the summer I found this cabinet at Goodwill for $19 and saw its potential. It was an old 70's style TV stand (when TV's were square. Ha!), and thought with a fun make-over it could become best friends with my recently revamped dining table. I am one of those people who love a good "Before and After." I find it kind of addicting. There is something in the result that is so satisfying! Even more gratifying, no sanding! I have refinished several pieces of furniture, and anything that takes out a step(especially one of the hardest) is always a welcome treat!

With an additional $20 in paint and primer, I happily transformed the old retro cabinet into a fun colorful piece of furniture. I confess I am a chevron nut! Hence the design I chose for the backing. But it turned out to be quite a simple project. Because it was made of fiberboard and laminate coating, I did have a small fear it would drive me to swearing, muttering to myself, and eventual insanity. Ha! But to my pleasant surprise, Pinterest offered me a solution. I think its safe to say it was a success! My results below:


The original Pin(over 500 pins!) and my inspiration:

http://thepeartreecottage.blogspot.com/2011/07/painting-particle-board-laminate.html?m=1

Here's how I did it:

Step 1:
Remove all hardware, shelves, doors, and hinges.

Step 2:
Wipe down all the pieces you intend to paint so they are nice and clean. (I had to fill in the cable hole as well.)

Step 3:
Prime every area you intend to paint. This step doesn't have to be perfect or pretty. It just needs a good coating or two of the primer. I painted several coats on the backing as I intended part of the white to be seen in the design. Then let it all dry completely.


Step 4:
Paint! I only had to use 2 coats.

Step 5:
When it was completely dry, I taped my design onto the back using Blue Painters tape and a measuring tape. I spaced the stripes out 1 and 1/2 inches apart and used a leveler to make sure I was keeping them at the right angle. Was really easy! Then I used some left over paint from my dining table project and filled in the taped lines.

After a few hours I pulled the tape off and Ta Da! Chevron stripes and a completed project!


Products I used:

1) Zinsser brand 123 Primer for All Surfaces in White from Walmart.(This is water based with no odor and went on so smooth.)
2) Colorplace Interior Semi-Gloss paint in Pistachio Ice Cream from Walmart. This also rolled on smooth.
3) Minwax Brand Polycrylic clear top coat. I love this top coat because it is water-based and doesn't smell and when it dries is a great protection. It also dries crystal clear unlike some of the others that have a yellowish tint. I have used this on several projects and already had this on hand. It is sold at Lowes.
4) Ultra smooth mini roller
5) Blue Painter's Tape
6) Measuring tape
7) Leveler

Hope this helps someone out with their next project! I found this easy, and if I dare say it, enjoyable!


If you liked this, you may also like How to Refinish a Dining Table, No Sanding! Here:
http://pinterestandthepauper.blogspot.com/2013/01/how-to-refinish-table-no-sanding.html


Tuesday, November 20, 2012

Pinterest and the Pauper!

Welcome to Pinterest and the Pauper! I am Amanda, a complete and self proclaimed Pinterest addict. If you're anything like me, you LOVE Pinterest too and maybe even have an unhealthy relationship with it. Guilty of clicking "See More Pins" when you should be headed to bed instead? Guilty as charged! I have attempted many a pin and have boards full of online treasures.  But I find myself with this unsatisfied need. Why is my closet not full of those great outfits? Why do I not look like one of those perfectly sculpted makeup tutorials? Why does my house not look like a Pottery Barn ad? And why am I not a gourmet chef?  My boards say I should be all those things!

So, I decided that I want more. I want the pleasure of a real relationship with Pinterest and want more than just a board of Pins. I am taking it into my own hands.

Now the bigger issue....I am not the Princess in this scenario. More like the Pauper or perhaps the Princess on a budget? Ha! Have you seen the cost for that perfect pair of boots, or that beautiful DIY dining room table?  Um...yeah. Not everything is in my budget. So, my goal is to find those outfits I love for less. To make those delicious mouth watering meals for less. To recreate that perfect look for less. To get crafty for less.  And you know what? If I can do it, anyone can. Being on a budget doesn't mean being featured on the People of Walmart or eating Mac and Cheese from a box every night. It just means we need to be clever and cunning and beat our pocket book to the punch.  We are worth the effort!

And so, I will be attempting to recreate my beloved pins and sharing the results here. I can't promise they will always be a success, but I hope that those who read this will enjoy it and be inspired by those behind the pins as much as I am. There are some wonderful fellow bloggers out there with fantastic ideas we have all pinned! Afterall, what is a board full of pins good for? Happy Pinning!